IAQ IQ, Spring 2017
©2017, Jeffrey C. May
When I was doing home inspections, I approached houses with a version of Carl Sandburg’s poem “Grass” on my mind. A refrain of the poem is “I am grass, I cover all.” While this might apply to grade, the words that I recited to myself were “I am water, I cover all,” which was more appropriate for the cause of many exterior building problems.
I can remember one inspection when I was approaching the house from the street and looking from my car at the unusual roof structure. It occurred to me that given the complex roof design, there was likely to be a water problem at grade below one of the valleys. Before the buyers arrived, I stepped out of my car, walked to that location, and immediately found decayed wood and termite activity close to grade as a result of roof-water splash.
Although the wood damage and pest infestation were not related specifically to the lack of a flashing, the thought process involved here is something that you should always use to anticipate the possible occurrence of a water- entry problem. Most potential water-entry problems are addressed (we hope) during construction when flashings are installed at vulnerable areas.
According to Wikipedia, flashings are “thin pieces of impervious material installed to prevent the passage of water into a structure from a joint. . .” Although in many cases, the presence of proper flashings cannot be determined visually, in some cases, enough of the flashing is visible or there is damage present suggesting the inadequacy of the flashing.
For a while, I worked as a consultant for a house-wrap manufacturer. Whenever the company received a complaint about a building problem supposedly related to their product, they would send me to the location to investigate the possible failure.
Typically I would be accompanied by a company representative and would be met at the site by a distraught homeowner expecting to receive a windfall of cash to repair the problem. Generally, a contractor involved with the building would also be present.
I drove or flew to these homes with some typical inspection equipment that included various tools and moisture meters as well as a few squirt bottles.
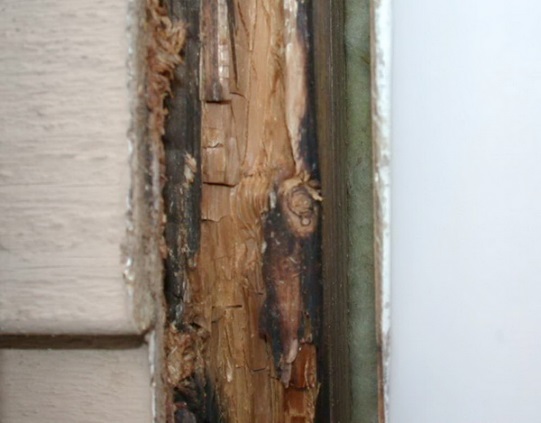
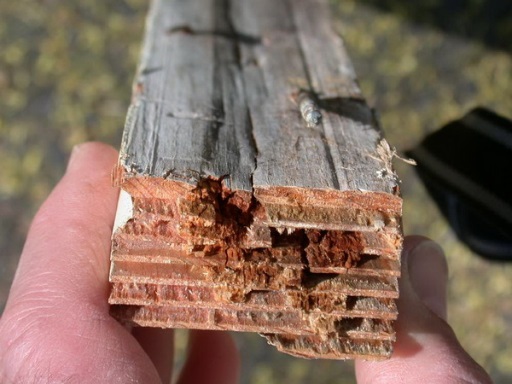
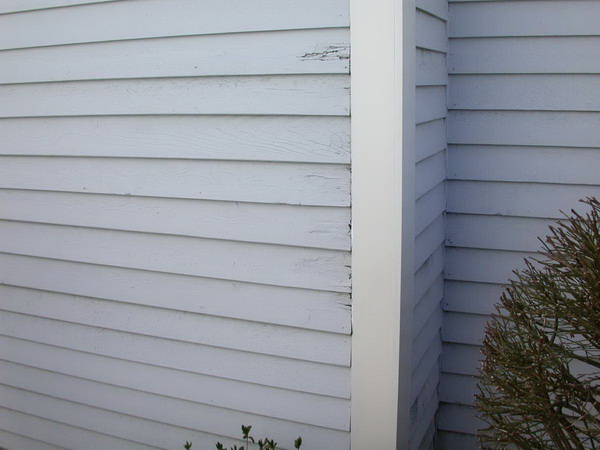
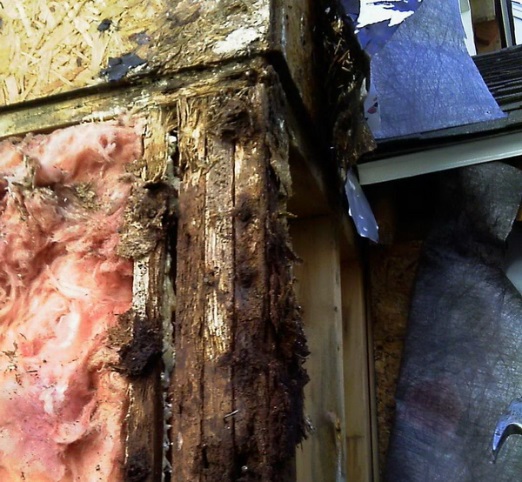
Most often but not always, I would find portions of the siding and/or trim that had been removed to reveal severe decay at the OSB or plywood sheathing. Generally, the damage was around windows or doors or at the corners of buildings.
After assessing the damaged areas, I would look around carefully at the exterior to determine if there were any areas where construction or flashing defects might lead to water entry behind the siding.
The most common error that I observed was the improper installation of window-cap and door-cap flashings. These flashings installed above the horizontal trim casings are supposed to shed water to the front of the flashing and away from the trim board. In over 90% of the installations, the portion of the flashing over the trim board was bent upward at the drip end, thus preventing water from dripping off the flashing.
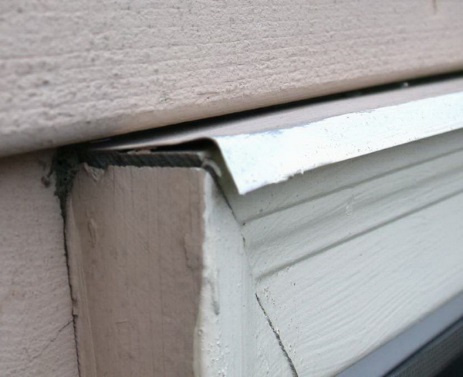
Instead the water would gather at the back of the flashing, and some of the water would soak into the back of the clapboard in contact with the flashing (often causing paint peeling). Most of the water would then flow to the ends of the flashing, where it would flow down joints such as the casing joints and the joints between the butt ends of the clapboards and the vertical casing trim surrounding the window or door.
My procedure for the investigation was pretty much always the same. I would fill one of my squirt bottles with water and put some water on top of the flashing to demonstrate that the water was being trapped at the back of the flashing and then flowing down vulnerable trim and siding joints.
After I had added about a pint of water, often water would start pour out of clapboard joints, indicating water entry behind the siding.
Generally, the contractor present would then remove some of the window or door trim and siding and find (to his or her great consternation) that water had entered the space behind the siding and or trim.
If the contractor responsible for the construction defect was present and was the person who convinced the homeowner that the house wrap was at fault for the sheathing decay, he or she would often be in disbelief. In some cases the contractors were actually quite angry, and in one case I was actually threatened.
In all of the dozens of investigations that I conducted, the builder and not the house wrap was responsible for the water entry. But in one case, the homeowner was responsible because he had not cleaned his gutters in 15 years.
Given the fact that this defect in cap flashings is so prevalent, you may wonder why hidden decay is not more common. This question can be answered by going back to my version of Sandburg’s poem, “I am water, I cover all.”
Most of the cases that I investigated were at homes which were subjected to unusual windblown rain. Some of the homes were at the coast, and others on the sides of hills; some did not have gutters or roof overhangs.
The point here is that unless there is significant water flow down the siding, there will not be much water accumulation at the top of the flashings (which intercept and deflect the water flow). Functioning gutters, long roof overhangs and the lack of significant windblown rain mean that roof-water flow will either drop directly to grade (from the roof edge) or, if functioning gutters are present, flow to the ground via downspouts. Thus rainwater will not be flowing down the siding.
Portions of window-cap and door-cap flashings are usually visible, and generally you can tell by looking if they have reverse pitch. If you want to take the time, you can actually test these with some water from a soft-drink bottle to see if they are working properly. Keep in mind that it is not worth testing windows at upper floors that are directly below a roof overhang (as these do not experience significant water flows). The most likely place to test would be at a side with reversed-pitch cap flashings that face the direction of the prevailing wind and/or above which there is no roof overhang (such as at a gable end).
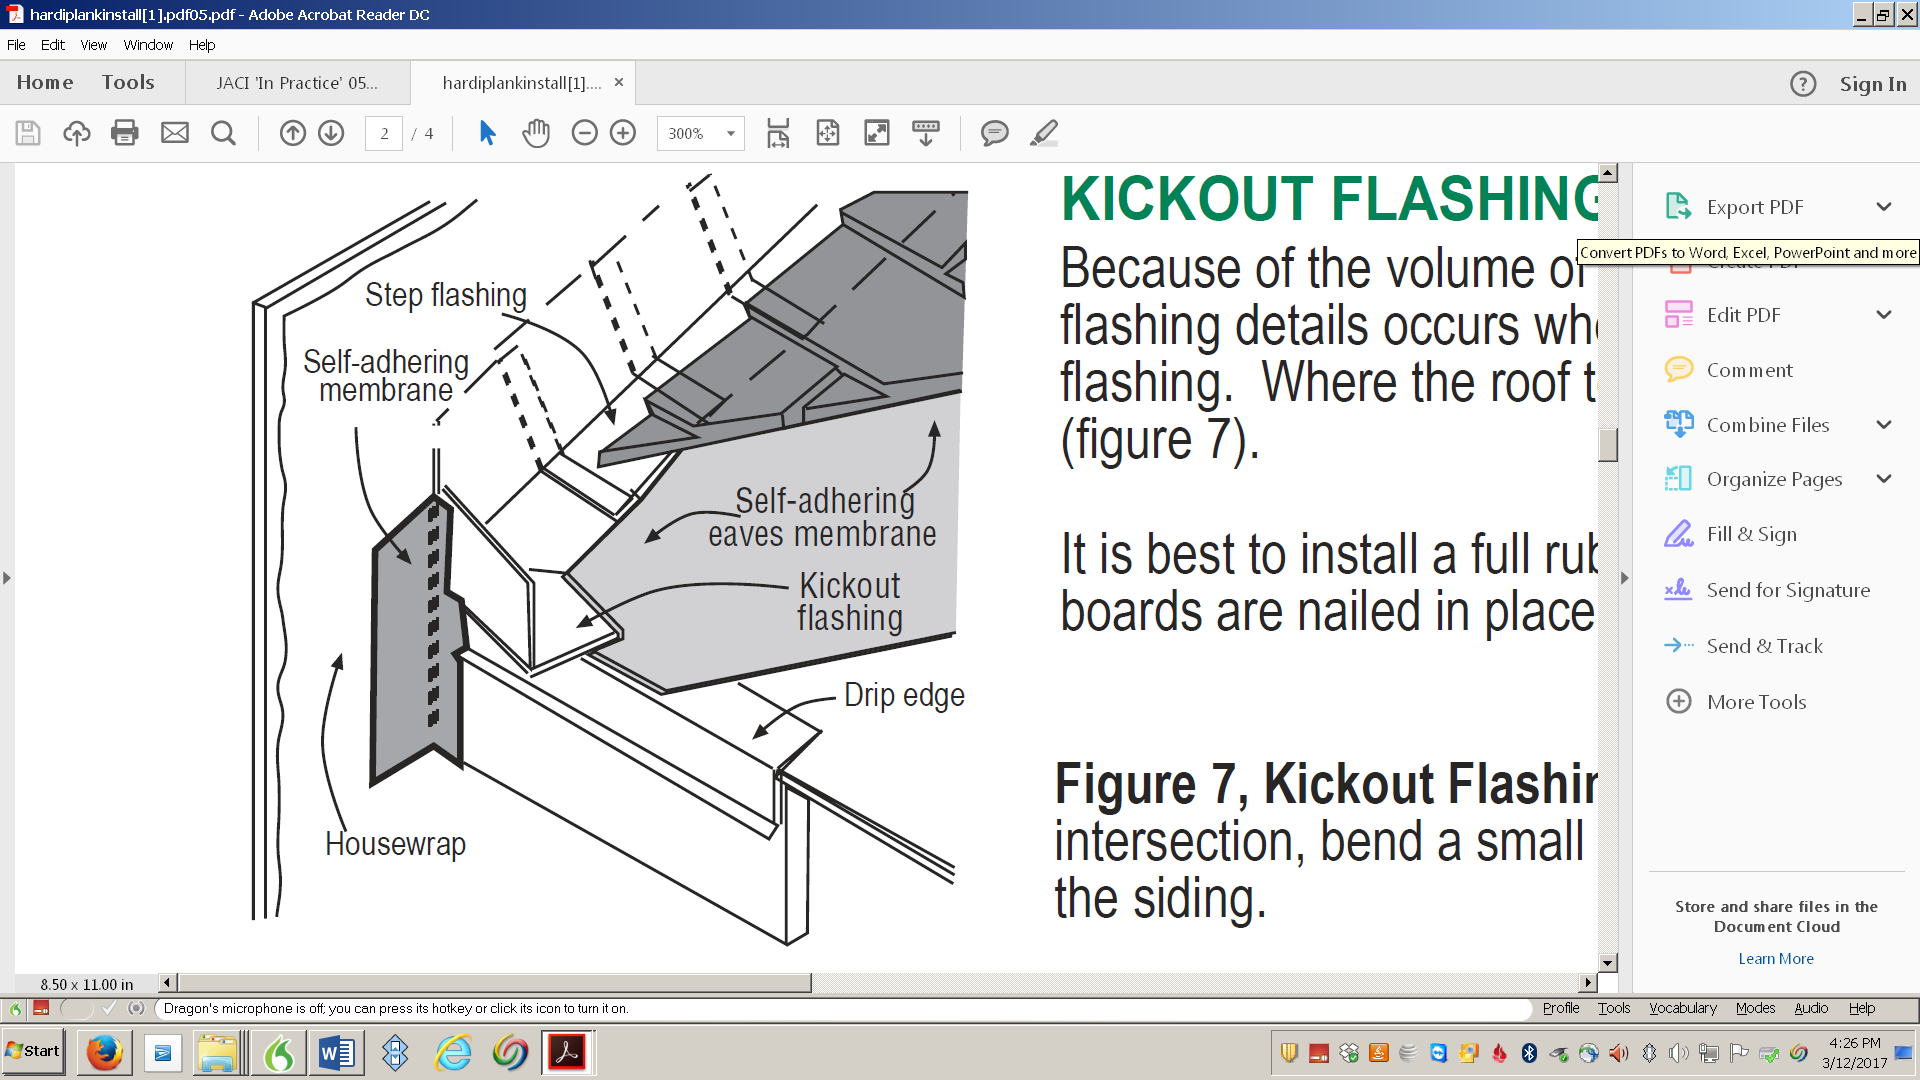
Another construction weak point is at the intersection between the siding of a second floor and a first-floor roof.
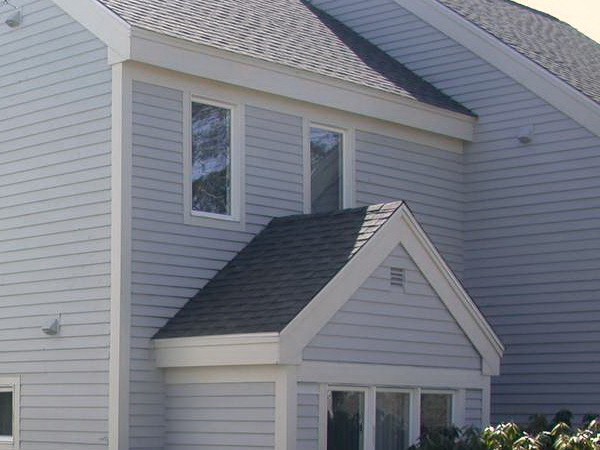
Unless the intersection is literally waterproof, a kick-out flashing is usually needed; for cement board siding, installation of a kick-out flashing is required.
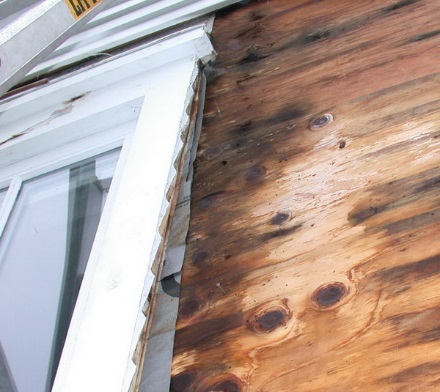
I was asked to do an air quality investigation of a condo in a large complex of identical multi-unit buildings. The purpose of my visit was to determine why there was a musty odor in the owner’s bedroom at the first-floor. There was some siding and trim decay at an exterior corner of the bedroom.
There was no gutter at the upper rear-roof gable, and copious amounts of water flowed from the upper roof onto the surfaces of a lower roof, where there was no kick-out flashing.
Water must have been flowing into the space behind the clapboards since the day of construction. The minor decay that was visible at the clapboard ends was nothing as compared to the sheathing and framing decay that was revealed after the siding was removed.
Had there been a kick-out flashing present, it is unlikely that this damage would have occurred. The musty odor at the bedroom interior was due to the microbial activity surrounding the wall cavity that was insulation filled. It is worth noting that there were no stains at the interior of the bedroom. There also would not have been mold-spore exposure as a result of all of the microbial activity at the exterior side of the cavities.
Spores could not enter the interior space because they are too large to diffuse through the drywall. Odors from mold and/or bacteria, on the other hand, such as microbial volatile organic compounds (MVOCs),] consist of molecules that can diffuse through the semi-porous paper and plaster of the drywall.
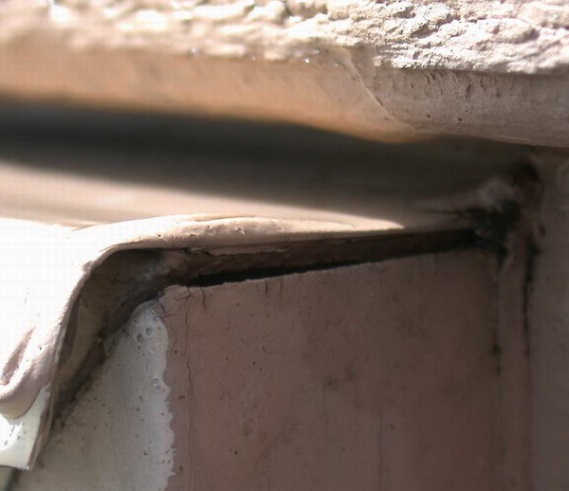
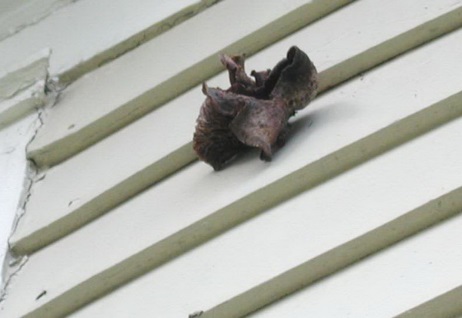
On two occasions I actually found mushrooms growing out of the siding on a home. In both cases there was a flashing leak at the roof edge above.
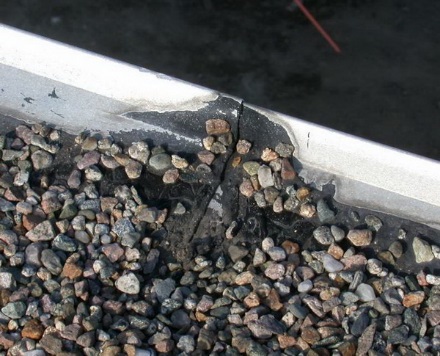
If you see a gap like this in a roof flashing, you can easily test to see if it is a source of water entry. Place a drop of water on the crack; if the water is sucked in, place another drop. If several drops of water enter, the opening is likely to be a leak source. You don’t need to use a hose to see if a gap such as this is a problem. A small amount of water entry is sufficient proof for a failure and the need for repair.
Flashing problems should be of concern to a host of professionals: contractors, architects, building consultants including home inspectors, and air quality consultants. Unfortunately, such problems can also land in the laps of lawyers and insurance companies. So in your client’s interests as well as your own, keep an eye out for flashing issues.